Theron’s Mac And Cheese

Ingredients

12 oz box pasta (elbow, fusilli, or some type that will hang on to sauce)
2.25 cups water
1.5 cups milk
3 cups cheese
use a mix of hard cheeses and melty cheeses
I have been using gruyere, cheddar, and mascarpone
nutmeg
ground mustard
pepper flakes (or cayenne pepper)

Preparation

Put milk and water in sauce pot large enough to hold the pasta and cheese and slowly (SLOWLY) heat
really slowly
no, really slowly
like start on the lowest setting and when pan is warm to the touch, increase to next highest heat
do this until incremental increase in temperature to avoid scalding until mixture is just boiling

Add uncooked pasta and reduce heat to a simmer
cook pasta until just past al dente, 6-8 minutes
season with pepper flakes (or cayenne pepper), ground mustard, salt, and white pepper

Add ~1 cup of high-water shredded cheese (such as deli American or mozzarella)
when melted, remove the pot from heat
add ~1 cup of denser cheese (such as gruyere or cheddar)
stir until melted
add mascarpone cheese (or Neufchatel or Philadelphia cream cheese)
stir until mixed

You can stir in any mix-ins at this point. I like to add ground beef or tomato sauce.

The Best Mac And Cheese Is Not Mac And Cheese

Traditional mac and cheese is a baked dish consisting of macaroni pasta covered in cheese sauce and topped with bread crumbs.

No part of traditional mac and cheese is gluten-free.

The sauce is emulsified by with a roux – a mix of flour and fat that serves to thicken and emulsify the sauce and prevent the cheese from “breaking” (separating into curds and whey, which gives a grainy texture).

The macaroni is a dried pasta made with durum wheat.

The topping is optional, but provides a nice contrast in texture.

There are workarounds for all of these, and there are plenty of options. For quick and convenient mac and cheese, I like the Amy’s Gluten Free Mac And Cheese.

But sometimes it’s good to splurge a bit.

Mac and cheese is one of those things that is made traditionally for the sake of being traditional.

Macaroni works just fine, but the point of the pasta is to hold the sauce. And thicker sauces benefit from pasta shapes with more surface area. I personally prefer fusilli (sometimes called rotini), a kind of spiral stick pasta. All the good gluten-free pasta manufacturers make fusilli pasta.

The only real reason to bake mac and cheese is to crips the topping. You can accomplish the texture benefits in other ways (crispy bacon bits, chives, or even pre-toasting bread crumbs). All that’s missing is the yummy, crispy browned cheese, thanks to the Maillard reaction. (More on that in a bit.)

An idea I’ve been playing around with – but don’t have entirely worked out yet – is to brown the top of each serving by grating parmesan cheese on top of the mac and cheese and browning it with a blowtorch.

The cheese sauce is made on the stovetop, and then cooked pasta is mixed in. At this point, it’s cooked and perfectly edible. I often convince myself there is no point in dirtying a casserole – or waiting to eat the yummy mac and cheese.

While we’re at it, why dirty another pot cooking the pasta before adding it to the sauce? We’re going to use liquid (typically dairy) to make the sauce, so let’s just cook the pasta in the dairy!

The hare-brained geniuses at Modernist Cuisine started this whole one-pot mac and cheese thing several years ago, and they looked into why Kraft Mac And Cheese works so well where many home recipes fail. And it comes down to science – an emulsifying salt called sodium phosphate. They use a more easily attainable alternative, sodium citrate.

You can get sodium citrate at well-stocked food shops, or order it on Amazon. (It has to be the salt version – citric acid will do the opposite of what you want, and it is used in cheesemaking to create curds from milk.) But I never have sodium citrate on hand when I want to make mac and cheese, so I use something that often is employed as an emulsifier – mustard seed powder. (Mustard is a common ingredient in mac and cheese.)

Cheese selection is crucial. It’s one of the headliners of the dish, after all.

Since emulsification is the name of the game, we can use the dirty secret of the cheese world – American Cheese. We’re not talking about “processed cheese food” – no knockoff Kraft singles for you. Real American cheese is a mix of firm cheeses like cheddar, formed into blocks. They include emulsifiers to keep everything nice and uniform. And it can be purchased in loafs from deli counters.

You can also use another emulsified cheese food product – Mascarpone. Which is what I use.

We need a mix of flavors, too. All the fat will tend to mask flavors, so having some more strongly flavored cheeses will help. Experiment – sharp cheddar, smoked gouda, gruyere, just about anything.

Theron’s Mac And Cheese

Pressure Cooker Mesh Basket Tip

So we just recently got one of those Instant Pot pressure cookers. It’s pretty great for high temperature/pressure cooking, light canning, and slow cooking.

There are lots of different pressure cookers to choose from – we got the Instant Pot because it has multiple modes and has Bluetooth smartphone connectivity. Pressure cookers don’t have to be as expensive or complicated, and are much more common in European and Aisan homes and commercial kitchens, which is a shame – it’s a great tool for any kitchen.

The Instant Pot works great as a steamer, but the it doesn’t come with a large basket. One cool little hack people are doing is buying this 3 quart mesh basket which fits inside the cooker – except for the handles. It’s common enough that it shows up in the “commonly bought with” section on Amazon.

So, I was asked to remove the handles off one of these today. My first thought was to grab the Dremel tool, but that seemed excessive and I didn’t want to deal with sharp edges. The handles are just spot welded on to the brim, so I figured it should be relatively easy to break the weld point. I don’t have any experience with these, so I did a little research. Everything I see are about using pliers or a shop vice.

But all you need to do is hold the rim near the handle with one hand, and rock the handle back and forth (perpendicular to the rim) with the other hand. You don’t want to bend the rim, so start off gently, but the handle will move. The spot weld is a weak point, and without too much force it will break off.

Walking To End MS

Sunday April 17th 2016 is the annual Greater Los Angeles Walk MS.

This is the fifth year I’ve done the walk, but this is the first year I’m trying to raise money for the National MS Society.

So far, I have raised over $1100 for the National MS Society. Please consider supporting this cause by donating to my National MS Society fundraising page.

All donations go directly to the National MS Society. They are a national charity that supports those with Multiple Sclerosis and fund research for treatments and a cure. More than 80% of their money goes to non-fundraising programs.

How Big Is That Rice Cooker Measuring Cup?

If you have a rice cooker, you know that little measuring cup you’re supposed to use to measure the rice? How big is it? If you lose that little cup, how do you measure your rice?

You can pay as much as $10 for a replacement cup, which is insane given that you can buy a cheap-o rice cooker for $15. You may as well buy a new rice cooker!

However, I have a 3D printer, so the idea of paying anything for a tiny bit of injection molded plastic seems pretty silly.

But the question was how big is that cup? It doesn’t match any other measuring device in the kitchen. It’s close to 3/4 cup, so some rice cooker manufacturers recommend that.

In truth, the important thing is the ratio of rice to water, though it depends on the type of rice (anywhere from 1.25 to 2 parts water to 1 part rice), and there is a fair amount of leeway on the precision.

My rice cooker is a “neuro fuzzy logic” Matsushita model imported from Japan many years ago when smart rice cookers were just becoming a thing in Japan but weren’t yet available in the U.S..  I paid a pretty penny for it, but it gets lots of use and it still works today.

The bowl has markings on the inside to fill water based on the type of rice and number of measuring cups of rice. So the cup is super convenient and it would be a pain to have to measure both rice and water.

So how big is the rice measuring cup? The rice measuring cup is 1 gō, an archaic unit of measurement that is essentially defined as one serving of rice.

The whole system of measurement is called Shakkan-hō, named after two of the primary units: Shaku (length) and Kan (mass). (No relation to the stage name of the singer Chaka Kahn.) It’s derived from a Chinese system that dates from the 13th century BC, and were adopted by Japan in the 8th century BCE. It was abandoned in 1924 for the metric system.

A gō is 1/1000 of a koku. A koku was originally defined as a the amount of rice needed to feed one person for one year. Given something between 2-3 servings of rice per day, a gō is a single serving of rice. Koku was also used to measure the capacity of cargo ships, and to determine taxation.

A koku is about 40 gallons, or 180.4 liters. Which makes a gō 180.39 milliliters, which we can safely round down to 180 ml, which is 0.76 cups or just a smidge over 6 fluid ounces. (This is the size of the original Coca-Cola soda fountain glasses, so you can use one of those for measuring your rice if you want).

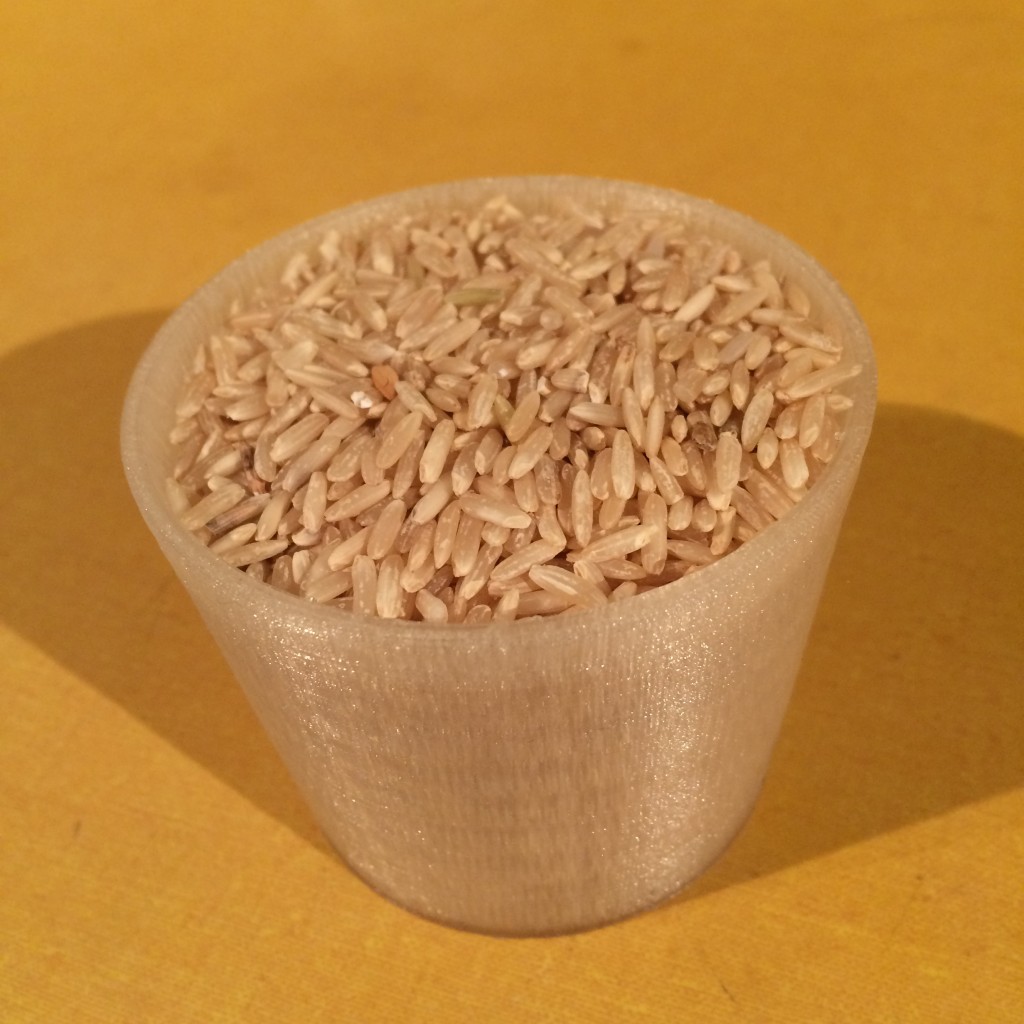
Anyway, I used an open source tool named OpenSCAD to design a 3D model for a 180 ml cup and printed it out. I posted it to Thingiverse and YouMagine if you want to download a copy of the OpenSCAD script or the STL model. Here’s what it looks like printed out (filled with long grain brown rice):

Gō

Curry

The word “curry” is kind of a funny thing. Westerners think of it as an Indian dish, but apparently, if you ask someone from India about curry, they won’t know what you’re talking about. Or at least it won’t be a “thing” to them.

Not that they don’t eat what we call “curry” in India. It’s just more a cooking method than a dish. Or so I gather.

There was a Thai place near our house that we were ordering take out on Sundays, and they had a couple different curries that we ordered just to have for lunches during the week. It seemed dumb to be spending take out side dish prices for a cup of curry when I could be making it.

I started doing research, but was quickly intimidated by recipes because every one was different, and they didn’t make it clear what was essential and what was optional. So here is what I’ve figured out.

The core of curry is a mixture of spices, called garam masala. I’ve read that there are as many garam masala recipes as there are cooks, so there’s not a standard combination.

Curry is essentially a sauce that is built on a base of onion, garlic, and ginger. This part seems pretty standard, kind of an Indian version of mirepoix (onions, garlic, and celery – a common French sauce base).

The spices are mixed with this base, and some combination of tomatoes, chicken or vegetable stock, coconut milk, and yogurt.

The sauce usually has various chopped vegetables and/or meat cooked in it.

This obviously allows for all kinds of variations, hence all the different recipes. So here is what I ended up making:

Garam Masala

Ingredients
  • 2 tablespoons cardamom seeds
  • 2 tablespoons coriander seeds
  • 2 tablespoons black peppercorns
  • 1 tablespoon cumin seeds
  • 1 tablespoon mustard seeds
  • 20 cloves
  • 1 stick cinnamon, broken into pieces
  • 1 dried chile de arbol, stemmed, seeded, and crumbled
  • 1 teaspoon nutmeg, freshly ground
  • 1 teaspoon kosher salt
  • 1/2 teaspoon freshly ground black pepper
Directions
  1. Roast the first eight ingredients (everything but the nutmeg, salt, and ground pepper) in a pan over high heat for a few minutes (until it smells really good and the seeds start popping).
  2. Cool for 5 minutes.
  3. Grind everything together.
  4. Makes enough for several batches of curry. Store in a cool, dark place.

Curry

Ingredients
  • 1 pound meat (pork tenderloin, beef, chicken), cubed
  • 4 tablespoons garam masala (see recipe above)
  • 1 large onion, diced
  • 4 cloves of garlic, finely chopped
  • 2 teaspoons ginger root, peeled and finely chopped
  • 2 Serrano chiles, stemmed, seeded, and finely chopped
  • 1 box or large can of chopped tomatoes (I used Pomi chopped tomatoes – see notes in Tomato Sauce recipe)
  • 1 can (13.5 ounce) coconut milk
  • 1 carrot, diced
  • 1 potato, diced
Directions
  1. Season meat with 2 tablespoons of the garam masala and cook – I like cooking the meat sous vide.
  2. Heat a couple tablespoons of oil (I prefer safflower oil, but any neutral high-heat oil will do) in a sauce pan in medium-high heat.
  3. Sauté garlic, ginger, and chiles in the oil until they smell good (a minute or two).
  4. Add onion and 2 tablespoons of the garam masala to the pan, reduce heat to medium, and sauté until the onions start to soften and turn translucent (5-10 minutes).
  5. Add tomatoes and stir until the sauce starts to bubble and reduce heat to a simmer.
  6. Stir in the coconut milk, carrots and potatoes.
  7. Simmer long enough to cook the vegetables, stirring occasionally.
  8. Stir in cooked meat, and simmer until ready to serve over rice or noodles.

Makes about 8 servings.

The longer the curry simmers, the more the flavors mix and the better it tastes, but you may want to partially cover the pan to avoid reducing it too much.

Lasagne

Okay, here’s the lasagne recipe that I made with my tomato sauce.

This recipe is designed for a large 11×14″ (4 quart) casserole. If you only have the more common 9×13″ (3 quart) casserole, either make a second smaller casserole (like a 8×8″) or plan on having leftover tomato sauce and cheese.

Ingredients
  • 12 ounces lasagna noodles (I like RP’s fresh gluten free lasagna sheets)
  • 2 batches (about 50 ounces) pasta sauce (see Tomato sauce recipe)
  • 1 pound sausage
  • 1 pound ground meat (lamb, pork, beef, etc.)
  • 1 tablespoon ground fennel seed
  • 2 15-ounce containers ricotta cheese
  • 2 eggs
  • 3 tablespoons chopped parsley
  • 4 cups shredded mozzarella cheese
  • 1 cup finely shredded parmesan cheese
  • 3 tablespoons arrowroot powder
  • salt
  • pepper
Directions
  1. Make the tomato sauce (see tomato sauce recipe).
  2. Remove the sausage from casing and brown.
  3. Season ground meat with salt, pepper, and ground fennel seed and brown.
  4. Add sausage and meat to tomato sauce.
  5. Add just enough water to arrowroot powder to make a slurry and stir into the tomato sauce and let simmer, stirring occasionally.
  6. Place noodles in casserole and pour hot water over it for a couple minutes, then remove and stack between paper towels to dry off. (If using dried lasagne noodles, partially cook them in boiling water instead.)
  7. Whisk the eggs and mix into ricotta.
  8. Add chopped parsley to ricotta mixture.
  9. Place a layer of lasagne sheets on bottom of a lightly-oiled casserole.
  10. Spoon 1/3 of the tomato sauce on top of the lasagne sheets and smooth with a spatula.
  11. Scoop 1/3 of the of the ricotta mixture on top of the tomato sauce and smooth out as much as possible.
  12. Sprinkle 1/3 of the mozzarella cheese on top of the ricotta cheese.
  13. Add two more layers of noodles, tomato sauce, ricotta mixture, and mozzarella cheese.
  14. Sprinkle parmesan cheese on top.
  15. Cover casserole with foil and place in a 350° F oven for 1 hour.
  16. When 15-20 minutes remain, remove foil to brown top.
  17. Rest for 10-15 minutes before serving.

A New Pasta To Enjoy

To cap off 2015, I made the second-best lasagna that I have ever had.

The best was at one of the Wolfgang Puck restaurants in Las Vegas many years ago. It was light and fluffy and I don’t even know what they did.

Last week, Whole Foods had two different brands of fresh gluten-free lasagna noodles, Manini’s and RP’s, so we decided to make a lasagna after our holiday travel madness. Which meant today.

I couldn’t find the recipe I usually use, which is probably a good thing – it usually ends up a watery, floppy mess. So I began researching lasagna recipes. The base is of course the tomato sauce, hence the tomato sauce recipe post yesterday.

Alton Brown did a slow cooker lasagna on Good Eats, and he avoids the water issue in two ways – by not actually using tomato sauce (he places sliced tomatoes in the lasagna instead so it turns into a sauce during baking), and by adding flour and powdered goat’s milk that soaks up the excess water and turns into a besciamella sauce while baking. Which is pretty smart.

The besciamella sauce is traditional in Italy, but ricotta mixtures are more common in the U.S. Which is what I am used to. And I like my tomato sauce too much to try his method. I wanted to try adding powdered goat’s milk, but I couldn’t readily find any, so I tried an experiment – I made a slurry with a few tablespoons of arrowroot powder and added that to the tomato sauce.

That did the trick. The lasagna came out nice and solid with no water. It was really good right out of the oven, and it is always better the second day so I’m looking forward to breakfast tomorrow.

I really like the RP’s lasagna sheets. They are a good size (four filled out my casserole with just enough overlap) and handled nicely. They don’t have any rice in them, but are made from millet, tapioca, sorghum, and amaranth.

The Manini’s lasagna sheets are rice-based and have eggs in them. They are nice and big, but I found them difficult to handle after cooking. So I’m trying these without precooking.

I’ll document the lasagna recipe and post it tomorrow.

EDIT – I initially had the two pasta brands reversed; this has been corrected.

Tomato Sauce

For some reason, I don’t particularly like tomatoes themselves, but I love tomato sauce.

Forget about jarred pasta sauces. They may be convenient, but the ingredients are usually a horror show of preservatives and mystery additives. It’s just not worth it – it’s way too quick and easy to make your own sauce.

If you have the time and energy, you can use fresh tomatoes. But you want to peel and seed them, which is a bit of a process. For everyday sauces, I keep chopped tomatoes in the cupboard. It’s a shortcut but it means you can make homemade tomato sauce in a flash.

I currently use Pomi chopped tomatoes. They come in 750g (~26 oz) boxes and stack nicely in the cupboard. I also like diced San Marzano tomatoes (even though the ones you can get in markets in the U.S. aren’t exactly “real”), but the Pomi boxes are BPA free (unlike most canned tomatoes), taste like actual tomatoes, are super-convenient, and there’s nothing added.

Honestly, most nights that I need a tomato sauce, I dump a box of the Pomi chopped tomatoes in a sauce pot, sprinkle in some dried oregano and basil, add a little sugar, and maybe some Sriracha sauce, and simmer for a bit. It takes 10-15 minutes, tops. It usually takes longer to cook the pasta.

However, here’s a recipe for when you have a little more time:

Ingredients
  • 1.5 pounds of tomatoes, peeled, seeded, and chopped – about 1 box or 1 large can
  • 1 medium onion (I like red, but white or yellow is fine), diced
  • 2 cloves garlic, minced
  • 1 large carrot, peeled and chopped
  • 2 tablespoons Safflower (or other high-heat) oil
  • 2 tablespoons dried oregano
  • 2 tablespoons dried basil
  • fresh-ground pepper (to taste)
  • salt (to taste)
  • 1/4 cup turbinado sugar (optional)
  • 2 tablespoons Sriracha sauce (optional)
Directions
  1. Heat oil over medium-high heat in a sauce pan.
  2. Sauté garlic until it smells good.
  3. Add onion and carrot and sauté until the onions start to turn translucent and the carrots start to soften.
  4. Stir in chopped tomatoes.
  5. Season with 1 tablespoons each of oregano and basil.
  6. Cook, stirring occasionally, until sauce starts to bubble.
  7. Decrease heat to a simmer.
  8. Add sugar to taste, if desired. The carrots should already provide some sweetness, but you may want a sweeter sauce.
  9. If you want a thinner sauce, use an immersion blender to adjust the chunkiness as desired.
  10. Stir in remainder of oregano and basil.
  11. Season with salt and pepper to taste.
  12. If desired, squirt in Sriracha sauce.
Notes

Makes about 25-30 ounces of sauce, depending on your add-ins and how long it simmers – enough for about a pound or two of spaghetti, depending on how much you like. You can double the recipe to make enough for a typical lasagna.

The longer you simmer the sauce, the better it gets. It also gets thicker and less watery as well, which can be helpful if you want to use it for pizza or lasagna.

You can add in cooked meat or vegetables as needed for your use.

What Is “Real” Sugar?

Don’t drink sugary sodas. Really. They’re not good for you. And some say that diet sodas are even worse.

And there are those who say that the high fructose corn syrup used in most sodas is far worse for you than the old fashioned sodas made with sugar cane or beet sugar.

There are people who swear that sugar cane sweetened sodas taste better than those sweetened with HFCS. And many of those folks swear that Mexican Coke tastes better because it is sweetened with cane sugar. But a study investigating the fructose/sucrose mix of different foods and drinks showed that Mexican Coke has far too much fructose in it to not be at least partly HFCS sweetened.

Despite the corn syrup industry’s concerted efforts to convince you that it’s all the same stuff.

So just drink water. Your body needs it, it’s good for you, and it won’t make you fat.

Continue reading